Another way to cut down on the modelling time is to re-use assets from previous models, with Realtime, their constant use of vehicles allows for wheels, wings and engines to be copied over to new projects to save time. As mentioned previously procedural rock creation is used for environmental modelling, a low poly mesh is generated, mapped (box mapped/planar mapped) and then subdivided.
The Animation is generated in passes with the pipeline running alongside the animation process. This means the client can see a film at the specified length from the early stages and identify each level of progress in turn. Here is a breakdown of the animation Passes and what they involve:
1st Pass
- Blockout models used
- No secondary movement
- Main action pinned
- Finalised cameras
- Final edit
- Blockout models replaced
- Secondary animation
- Explosions added
- Damage added
- (Hold back on final renders for the client's "wow" factor)
- Finished Environments- matte paintings combined
- Mattes Split (parallaxing)
- Animation merged
- Model and shader updates applied
- Scene passed for FX
All of the production is in 3DS MAX, XSI and composited in After Effects.
Fume FX is used alot in their most recent projects for explosions.
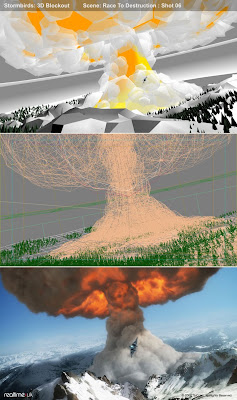
a great example of an explosive shot involves a nuclear explosion. This used 2 particle effects (particle flow system), a rotating pallete system applied to a torus and a cone.
The lighting rigs and render settings are taken from previous projects as the benchmark and tweaked from one project to the next for proven performance. 4 rigs are needed in total, lighting and shaders are tweaked, Global Illumination is baked to static objects to cut render time. A single frame will take an average of 2 hours to render when split across 50 machines processing power. When eventually brought into After-effects the colour matching, film grain, vignets and exposure filters are applied and they finally produce the desired shot.
This was a brilliant presentation, It made me realise the industry hasn't totally shifted to Maya and has prompted me to get into Max a little more. I hope my notes are useful to people and i hope to post more of the Animex speakers soon. Keep me posted with any comments about the notes i'm putting up.


No comments:
Post a Comment